SCCM 2012
1. Client may not send/receive any policies and will not run any advertisements.
Finding the Issue: There are few log files which you should look into,
CCMSETUP.LOG – This log file will have the details about the client installation
ClientLocation.Log – It helps to find out if the client is assigned to the SCCM site or not.
LocationServices.Log – It records if the client is communicating with the Distribution point or management point to receive policies.
Open Configuration Manager Properties, switch to Actions tab and check if you are able to see at least 5 policy agents displaying which means the client is healthy.
2. Client fails to send inventory data to configuration manager site or fails to send status messages to the server.
Cause: This issue may occur if the WMI of the client computer is corrupt or not working.
Solution: Check all the services which are required for the communication with the server, .eg:
• Computer browser
• Windows installer
• SMS agent host
• BITS
• WMI
All the above mentioned services should be automatic mode and started.
• Computer browser
• Windows installer
• SMS agent host
• BITS
• WMI
All the above mentioned services should be automatic mode and started.
Then try repairing the WMI. To repair WMI follow the steps below,
Step 1:
%windir%system32wbemwinmgmt /clearadap
%windir%system32wbemwinmgmt /kill
%windir%system32wbemwinmgmt /unregserver
%windir%system32wbemwinmgmt /reserver
%windir%system32wbemwinmgmt /resyncperf
%windir%system32wbemwinmgmt /clearadap
%windir%system32wbemwinmgmt /kill
%windir%system32wbemwinmgmt /unregserver
%windir%system32wbemwinmgmt /reserver
%windir%system32wbemwinmgmt /resyncperf
Step 2:
net stop winmgmt /y
net stop winmgmt /y
Step 3:
If exist %windir%system32wbemrepository.old rmdir /s /q %windir%system32wbemrepository.old
ren %windir%system32wbemrepository repository.old
regsvr32 /s %systemroot%system32scecli.dll
regsvr32 /s %systemroot%system32userenv.dll
for /f %%s in (‘dir /b /s %windir%system32wbem
If exist %windir%system32wbemrepository.old rmdir /s /q %windir%system32wbemrepository.old
ren %windir%system32wbemrepository repository.old
regsvr32 /s %systemroot%system32scecli.dll
regsvr32 /s %systemroot%system32userenv.dll
for /f %%s in (‘dir /b /s %windir%system32wbem
Step 4:
net start winmgmt /y
Note: Ensure that the Windows Management Instrumentation service is running after performing the above steps
net start winmgmt /y
Note: Ensure that the Windows Management Instrumentation service is running after performing the above steps
3. If the client fails to run an advertisement or if the software distribution failed on a client computer then how to troubleshoot?
Finding the Issue: Check the execmgr.log file in c:windowssystem32ccmlogs on the client computer which will capture the execution of the program. It contains the exit code to determine the failure reason or the exact reason for the failure, normally for success the exit code is 0. If the program is failed then the exit code will be < or > 0. From these exit codes the reason for the failure can be sorted out.
If the distribution is failed on group of computers then the failure reason can be verified by running the report named “All advertisements for a specific package”. This report can be executed by navigating to Site database->Computer Management->Reporting->Reports. In the right hand side you can see a report named “All advertisements for a specific package” right click on this report and run now you have to enter the package ID of the package which is failed, finally click on display.
4. After distributing the software to the client, if the software package gets failed to download into the client computer cache.
Cause: The software package may not be downloaded into the client computer cache if the client does not meet the requirement.
Solution: Ensure that the following services are up and running on the client computer
Background intelligence Transfer service
SMS agent Host
Windows Installer
Windows Management Instrumentation
SMS agent Host
Windows Installer
Windows Management Instrumentation
Check if the client is contacting the DP using LocaitonServices.log file and if not add the required DP to the package.
5. How to detect problems respect to no computer entry in SCCM while computer connected to network?
There are different reasons for a client computer not being displayed on the SCCM Console but connected to the network.
Solution: Check if the SCCM client is installed on the client computer by navigating to Control panel and look for “configuration manager” icon entry (assuming that the control panel view is set to small icons)
If the client is installed, then open services.msc in the client computer and verify if the SMS_AgentHost service is running, if not start the service.
Check the Firewall enabled or disabled if enabled, allow the ports to talk to site server
Finally do an update of collection membership as described below,
Open SCCM console and navigate to Site Database->Computer Management->Collections->”Right click on a collection where the required client is not present” then select “update collection membership” as shown below and finally refresh the same collection. The client may then report to the console.
6. How to install SCCM client on a computer?
Solution:
Client can be installed manually on a computer by executing the following command line:
CCMSetup.exe /mp:SMSMP01(MP Name) /logon SMSSITECODE=AUTO.
Client can be installed manually on a computer by executing the following command line:
CCMSetup.exe /mp:SMSMP01(MP Name) /logon SMSSITECODE=AUTO.
To run this command open a cmd prompt and change (cd) to the directory where ccmsetup.exe can be found (most likely in windir%system32ccmsetup on 32bit versions of Windows).
Then you can run above given command.
/mp:SMSMP01:- Specifies the management point SMSMP01 to download the necessary client installation files.
/logon: – Specifies that the installation should stop if an existing Configuration Manager 2007 or SMS 2003 client is found on the computer.
SMSSITECODE=AUTO:- Specifies that the client should determine its Configuration Manager 2007 site code by using Active Directory or the server locator point
Client can also be installed using Client Push installation method
Navigate to the SCCM console from “Start->All programs->Microsoft System Center-> Configuration Manager 2007->ConfigMgr Console”
Expand Site Database->Computer Management->Collections->”Select a collection containing the client computer”->Right Click on the client computer name displayed on the Right side details pane-> Select “Install Client”.
You will be prompted with the below screen. Click Next Select “Always Install” option. Then click next and finish.
Note:
If the SCCM Client needs to be installed on the domain controllers then the “Include domain controllers” option should be enabled.
If the SCCM Client needs to be installed on the domain controllers then the “Include domain controllers” option should be enabled.
7. How to check if the client installation is succeeded or not?
Solution:
The client installation status can be verified using the log file or Control panel icons.
The client installation status can be verified using the log file or Control panel icons.
To check the log file, navigate to C:WindowsSystem32ccmsetup of the client computer and open the ccmsetup.log and clientmsi.log file. If the installation is success then you can see a “Installation Succeeded” line updated in the log file.
Also you can navigate to Start->Control panel and look for configuration manager icon entry (assuming that the control panel view is set to small icons).
8. How to uninstall a client?
Solution:
To uninstall a client from the client computer, execute the following command on the client computer.
Solution:
To uninstall a client from the client computer, execute the following command on the client computer.
Ccmsetup.exe /uninstall
To run this command open a cmd prompt and change (cd) to the directory where ccmsetup.exe can be found (most likely in windir%system32ccmsetup on 32bit versions of Windows). Then you can run ccmsetup.exe /uninstall.
To confirm the Un-installation of the client, verify that the control panel icon is gone and ccmExec.exe process will be removed.
9. How to detect unusable/non active system resources in SCCM?
Solution:
Open SCCM console, navigate to Site Database->Computer Management->Collections->”Select a collection containing the client computer”. On the right side details pane you can see different tabs as shown below,
Open SCCM console, navigate to Site Database->Computer Management->Collections->”Select a collection containing the client computer”. On the right side details pane you can see different tabs as shown below,
Look for the “Active” tab and see if it’s Yes or No. If the status is “Yes” then the client is active, if it is “No”, then the client is inactive and if it is empty which means SCCM client has not been installed on the client computer
10. How to consult Resources Explorer in SCCM Administrator Console?
Solution:
Open SCCM console, navigate to Site Database->Computer Management->”Select the collection which contains the required client computer”. Right click on the client computer->Start->Resources Explorer as shown below.
Open SCCM console, navigate to Site Database->Computer Management->”Select the collection which contains the required client computer”. Right click on the client computer->Start->Resources Explorer as shown below.
Expand the client name and you can get the required hardware and software information.
Note: Windows update Agent, SCCM Client, Windows installer versions can be found under this resource explorer->Expand Hardware.
Note: Windows update Agent, SCCM Client, Windows installer versions can be found under this resource explorer->Expand Hardware.
11. How to force Software and Hardware inventory on remote client computers?
Solution:
Remote into the client computer and open control panel and navigate to “configuration manager” icon as shown below.
Then Switch to Actions tab and select “Hardware inventory cycle” and click on initiate action repeat the same step for forcing software inventory cycle on SCCM client computers.
Remote into the client computer and open control panel and navigate to “configuration manager” icon as shown below.
Then Switch to Actions tab and select “Hardware inventory cycle” and click on initiate action repeat the same step for forcing software inventory cycle on SCCM client computers.
12. How to a run a specific web based report to identify any status?
Solution:
Open SCCM console, navigate to Site Database->Computer management->Reporting and click on reports. You can a list of default and customized reports which can be executed by Right click-> run (this runs the query which is being used to create the report) to view the web reports as shown below.
Open SCCM console, navigate to Site Database->Computer management->Reporting and click on reports. You can a list of default and customized reports which can be executed by Right click-> run (this runs the query which is being used to create the report) to view the web reports as shown below.
If the report ID is known then the particular report can be searched using “Look for” option as shown in the screenshot below.
13. How to export list from SCCM Console and resource explorer?
Solution:
Open SCCM console; navigate to Site Database->Computer Management-> All Systems, Right Click->View->Export List as shown below. This list contains the client computer names and it can saved as notepad or in excel format.
Select the client computer for which the list needs to be exported and Right Click->Start->Resource Explorer. Go to “Action” tab and select export list as shown below.
14. How to export SCCM web reports?
Solution:
Open SCCM console, navigate to Site Database->Computer management->Reporting and click on reports where all the required reports will be listed. Right click on any report and click run to execute the report (assuming that the report is already been created).
Open SCCM console, navigate to Site Database->Computer management->Reporting and click on reports where all the required reports will be listed. Right click on any report and click run to execute the report (assuming that the report is already been created).
In the below screenshot “All advertisements for a Specific computer” has been executed.
The client computer name has been entered and click on display to run the query and the advertisement for the specific client will be displayed as shown below.
The client computer name has been entered and click on display to run the query and the advertisement for the specific client will be displayed as shown below.
Click on “Export” option as shown below to export the result to the excel sheet.
15. How to Speed up software advertisement by forcing Policy Retrieval & Evaluation cycle?
Solution:
Open control panel, navigate to Configuration manager icon and click on it. As the ConfigMgr window pops up switch to action tab and initiate the “Machine policy Retrieval & Evaluation Cycle” by clicking on “Initiate Action” button as shown below.
Open control panel, navigate to Configuration manager icon and click on it. As the ConfigMgr window pops up switch to action tab and initiate the “Machine policy Retrieval & Evaluation Cycle” by clicking on “Initiate Action” button as shown below.
16. How to verify the software package distribution status on a particular client machine?
Solution:
You can verify the status of a distribution by checking the execmgr.log file in c:windowssystem32ccmlogs folder, and search for the particular software distribution using the packaged. If the package is success then “installation succeeded with the exit code 0” will be written into the log file.
You can verify the status of a distribution by checking the execmgr.log file in c:windowssystem32ccmlogs folder, and search for the particular software distribution using the packaged. If the package is success then “installation succeeded with the exit code 0” will be written into the log file.
You can also verify it by checking the registry key on a client computer, HKLM->Software->Microsoft->SMS->Mobile Client->Software Distribution->Execution History->System-><Package ID>->success or failure code will be written.
17. The client push installation may not work if its account is configured incorrectly or missing?
Solution:
This can be confirmed from ccm.log file on the site server which says,
This can be confirmed from ccm.log file on the site server which says,
“Attempting to connect to administrative share ‘\COMPUTER1Admin$’ using account ‘domainaccount’
WNetAddConnection2 failed (LOGON32_LOGON_NEW_CREDENTIALS) using account domainaccount (0000052e)
LogonUser failed (LOGON32_LOGON_INTERACTIVE) using account domainaccount (0000052e)
ERROR: Unable to connect to remote registry for machine name “Computer”, error 5.
ERROR: Unable to access target machine for request: “Computer”, machine name: “Computer”, error code: 5”
On all potential client computers, the Advanced Client Push Installation process requires that you grant administrator rights and permissions to either of the following accounts:
• The SMS Service account when the site is running in standard security mode
• The Advanced Client Push Installation account
Clients that are not members of a domain cannot authenticate domain accounts. For clients that are not members of a domain, you can use a local account on the client computers.
For example, if you set up a standard account on each computer for administrative purposes, and all the accounts have the same password, you can define an Advanced Client Push Installation account as %machinename%account.
18. Checking the overall Compliance using Update Lists when deploying Monthly Updates
Solution:
The overall compliance of a monthly update can be viewed using the “Compliance 1 – overall compliance” report.
The overall compliance of a monthly update can be viewed using the “Compliance 1 – overall compliance” report.
To run this report open the SCCM console, navigate to Site management->Computer management-> Reporting->Reports, in the right pane you can list of reports from which select the above mentioned report and Right click->run.
When the report appears you will have to give some inputs like update ID and collection ID and click on display. Now you can view the overall compliance report of the monthly update.
19. If the operating system deployment through SCCM fails how you do identify the issue and troubleshoot it?
Solution:
When the client computer boots up with the Boot image and fails during the installation then there is an option to bring up a Debug command shell by pressing F8 option. This option is available only if the boot image in the SCCM server has been configured to “Enable command support”.
When the client computer boots up with the Boot image and fails during the installation then there is an option to bring up a Debug command shell by pressing F8 option. This option is available only if the boot image in the SCCM server has been configured to “Enable command support”.
After bringing up the Debug command shell you can then check for the basic network connectivity between client and server, also you can check the SMSTS.log which is usually stored in X:WindowsTempSMSTSLog or C:SMSTSLog or C:_SMSTaskSequence log file using the command prompt.
20. The SCCM client may not be installed properly or some agents won’t be running on the client computer. This client won’t be receiving any advertisements due to this issue.
Solution:
This can be verified from the control panel, configuration manager icon. Open the configuration manager item and swath to Action tab and if you see only some feature will be available like “User policy retrieval & Machine policy retrieval.
Look for the Locationserives.log file from c:windowssystem32ccmlogs and it will contain the following error messages,
“Failed to refresh trusted key information while refreshing mp list”
“Failed to verify received message 0×80090006”
“Failed to verify received message 0x8009100e”
Follow the below steps to resolve this issue,
• Log on to the SCCM management point computer by using an account that has administrative permissions.
• Click Start, click Run, type services.msc in the Open box, and then click OK.
• In the Services MMC snap-in, right-click SMS_EXECUTIVE, and then click Stop.
• In the Services MMC snap-in, right-click SMS_SITE_COMPONENT_MANAGER, and then click Stop.
• Click Start, click Run, type ccmdelcert in the Open box, and then click OK.
• You receive the message: “Successfully deleted cert”.
• In the Services MMC snap-in, right-click SMS_EXECUTIVE, and then click Start.
• In the Services MMC snap-in, right-click SMS_SITE_COMPONENT_MANAGER, and then click Start.
21. How to deploy an operating system on to an unknown or a bare metal (empty hard disk) Computers?
Solution:
a. Advise user to start the machine up and select the boot menu as soon as prompted.
i. Many different makes and models have different methods to boot via PXE, however the most common method is to press F12 on the initial BIOS screen.
b. Once the PXE process has begun it will attempt to connect to the PXE server. Once a response has been received ask the user to press F12 to continue when prompted
i. The user has only a couple of seconds to press F12 when prompted so make them aware prior.
ii. If the PXE fails to respond it could be a number of issues
1. The user’s machine is not located in the OS PXE Deployment collection, or the collection hasn’t been updated.
2. The Windows Deployment Server (WDS) is failing to respond to client requests.
3. User has not network connectivity, on this occasion it would be apparent from the on screen messages when attempting to get a DHCP address at the initialization of the PXE request.
iii. If successful the user should not see a windows loading bar
iv. Within a couple of minutes the user should see a company background with a Deployment wizard.
v. Click next
vi. Select “<<Task Sequence Name required>>” and click next
vii. The user will see a progress bar as the wizard checks the deployment point that all the packages required for the deployment are available.
viii. If this process fails ask the user to read out the name of the package it failed on and check the distribution status of that package.
ix. The deployment will now commence.
x. Deployments via PXE take roughly around 1hr and 30mins to complete.
22. How to rebuild a client computer using SCCM?
Solution:
Determine which type of Rebuild is required:
i. If the user cannot access their Windows OS then only a PXE deployment (Refer No: 21) can be used. This method cannot utilize USMT and will completely wipe the hard drive with no attempt to backup any user data.
ii. If the user can access their Windows OS then we can used the SCCM Client to start the deployment process utilizing USMT to attempt backup of the user’s profile.
For OS rebuild scenario to be successful the user’s machine must be available within SCCM. Move user machine to the OS Deployment Collection in SCCM
a. Connect to %SCCM Server %
b. Launch ConfigMgr Console
c. Expand the Computer Management Tree
d. Expand the Collections Tree
e. Right click on the OS PXE Deployments collection and select Properties
f. From the Properties Window select the Memberships Rules tab
g. Click the Create Direct Membership Rule button
h. On the first screen of the Create Direct Membership Rule Wizard click Next
i. Select System Resource from the Resource Class Drop Down
j. Select NetBIOS Name from the Attribute name
k. Input the user’s current machine’s computer name. Percentage signs can be used as wild cards to assist the search.
l. Click Next
m. Click Next
n. Click Finish
o. Right click on the OS PXE Deployments collection and select Update Collection Membership. It is also recommended you right click the same collection and select Refresh.
Desktop Rebuild via SCCM Client by retrieving policy
Retrieve latest Machine Policy for SCCM Client
p. Open Control Panel on the user’s machine
q. Double Click on the Configuration Manager Icon
r. Select the Actions Tab
s. Select Machine Policy Retrievals and Evaluation Cycle and press Initiate Action
t. This process can take a couple of minutes and if successful a system tray bubble will prompt you that a new OS Deployment is available.
Initiate OS Deployment
u. Open Control Panel
v. Double Click on Run Advertised Programs
w. Select <<Advertisement name required to run>>
x. Click Run
y. Click Agree to run the deployment when prompted to begin the deployment.
i. The deployment will take around 1hr 30mins to complete without consideration to profile data backup. The users of the user profiles on the machine will vary the total time taken.
23. How to monitor the OS deployment progress?
Solution:
a. In the Computer Management tree in SCCM ConfigMgr Console expand System Status.
b. Expand Advertisement Status
c. Click on <<Advertisement name to monitor the status>>
d. In the main contents window Right Click on <<Site name – Database name>>
e. From the Show Messages menu select All
f. You will now see status messages from all the deployments with the most recent ones at the top. If the machine hasn’t reported back for a long period e.g. 20mins that contact the user to investigate what is showing on screen as during the deployment this is your only visibility to the progress.
g. Errors and warnings show in the Status for the advert don’t always mean a complete failure however each error should be evaluated appropriately.
24. How to run an advertisement through “Run advertised program” item in the control panel?
Solution:
This “Run advertised program” in the control panel will have all the advertisement queued up in it which can be initiated manually.
This “Run advertised program” in the control panel will have all the advertisement queued up in it which can be initiated manually.
Open control panel, navigate to Run advertised program and click on it. You will see a similar prompt as shown below. Select the advertisement name that is listed and click run which is located at the bottom right of the window.
Now the selected advertisement will start running on the client computer.
25. How to take remote control of the client computer using SCCM console?
Solution:
Open SCCM console; navigate to “All systems” collections where your client computer will be populated. Right click on the client computer->Start->Remote tools.
26. Can I deploy applications by using task sequences?
You can use a task sequence to deploy applications. However, when you configure an application deployment rather than use a task sequence, you benefit from the following:
· You have a richer monitoring and compliance experience.
· You can supersede a previous version of the application and can uninstall or upgrade the previous version.
· You can deploy applications to users.
27. Does System Center 2012 Configuration Manager support the same client installation methods as Configuration Manager 2007?
Yes. System Center 2012 Configuration Manager supports the same client installation methods that Configuration Manager 2007 supports: client push, software update-based, group policy, manual, logon script, and image-based.
28. What is an “application” and why would I use it?
System Center 2012 Configuration Manager applications contain the administrative details and Application Catalog information necessary to deploy a software package or software update to a computer or mobile device.
A deployment type is contained within an application and specifies the installation files and method that Configuration Manager will use to install the software. The deployment type contains rules and settings that control if and how the software is installed on client computers.
The deployment purpose defines what the deployment should do and represents the administrator’s intent. For example, an administrative user might require the installation of software on client computers or might just make the software available for users to install themselves. A global condition can be set to check regularly that required applications are installed and to reinstall them if they have been removed.
31. What is a global condition and how is it different from a deployment requirement?
Global conditions are conditions used by requirement rules. Requirement rules set a value for a deployment type for a global condition. For example, “operating system =” is a global condition; a requirement rule is “operating system = Win7.”
32. How do I make an application deployment optional rather than mandatory?
To make a deployment optional, configure the deployment purpose as Available in the applications deployment type. Available applications display in the Application Catalog where users can install them.
33. Can users request applications?
Yes. Users can browse a list of available software in the Application Catalog. Users can then request an application which, if approved, will be installed on their computer. To make a deployment optional, configure the deployment purpose as Available in the applications deployment type.
34. Why would I use a package and program to deploy software rather than an application deployment?
Some scenarios, such as the deployment of a script that runs on a client computer but that does not install software, are more suited to using a package and program rather than an application.
35. Can I deploy Office so that it installs locally on a user’s main workstation but is available to that user as a virtual application from any computer?
Yes. You can configure multiple deployment types for an application. Rules that specify which deployment type is run allows you to specify how the application is made available to the user.
36. Does Configuration Manager help identify which computers a user uses to support the user device affinity feature?
Yes. Configuration Manager collects usage statistics from client devices that can be used to automatically define user device affinities or to help you manually create affinities.
37. Can I migrate my existing packages and programs from Configuration Manager 2007 to a System Center 2012 Configuration Manager hierarchy?
Yes. You can see migrated packages and programs in the Packages node in the Software Library workspace. You can also use the Import Package from Definition Wizard to import Configuration Manager 2007 package definition files into your site.
38. Does the term “software” include scripts and drivers?
Yes. In System Center 2012 Configuration Manager, the term software includes software updates, applications, scripts, task sequences, device drivers, configuration items, and configuration baselines.
39. Do references to “devices” in System Center 2012 Configuration Manager mean mobile devices?
The term “device” in System Center 2012 Configuration Manager applies to a computer or a mobile device such as a Windows Mobile Phone.
40. What does “state-based deployment” mean in reference to System Center 2012 Configuration Manager?
Depending on the deployment purpose you have specified in the deployment type of an application, System Center 2012 Configuration Manager periodically checks that the state of the application is the same as its purpose. For example, if an application’s deployment type is specified as Required, Configuration Manager reinstalls the application if it has been removed. Only one deployment type can be created per application and collection pair.
41. Do I have to begin using System Center 2012 Configuration Manager Applications immediately after migrating from Configuration Manager 2007?
No, you can continue to deploy packages and programs that have been migrated from your Configuration Manager 2007 site. However, packages and programs cannot use some of the new features of System Center 2012 Configuration Manager such as requirement rules, dependencies and supersedence.
42. What is the quick guide to installing the Application Catalog?
If you don’t require HTTPS connections (for example, users will not connect from the Internet), the quick guide instructions are as follows:
1. Make sure that you have all the prerequisites for the Application Catalog site roles.
2. Install the following Application Catalog site system roles and select the default options:
· Application Catalog web service point
· Application Catalog website point
3. Configure the following Computer Agent device client settings by editing the default client settings, or by creating and assigning custom client settings:
· Default Application Catalog website point: Automatically detect
· Add default Application Catalog website to Internet Explorer trusted site zone: True
· Install Permissions: All users
43. Can I use update lists in System Center 2012 Configuration Manager?
No. Software update groups are new in System Center 2012 Configuration Manager and replace update lists that were used in Configuration Manager 2007.
44. What is an “update group” and why would I use one?
Software update groups provide a more effective method for you to organize software updates in your environment. You can manually add software updates to a software update group or software updates can be automatically added to a new or existing software update group by using an automatic deployment rule. You can also deploy a software update group manually or automatically by using an automatic deployment rule. After you deploy a software update group, you can add new software updates to the group and they will automatically be deployed.
45. Does System Center 2012 Configuration Manager have automatic approval rules like Windows Server Update Services (WSUS)?
Yes. You can create automatic deployment rules to automatically approve and deploy software updates that meet specified search criteria.
Remote Control:
The following frequently asked questions relate to remote control.
46. Is remote control enabled by default?
By default, remote control is disabled on client computers. Enable remote control as a default client setting for the hierarchy, or by using custom client settings that you apply to selected collections.
47. What ports does remote control use?
TCP 2701 is the only port that System Center 2012 Configuration Manager uses for remote control. When you enable remote control as a client setting, you can select one of three firewall profiles that automatically configure this port on Configuration Manager clients; Domain, Private, or Public.
48. What is the difference between a Permitted Viewers List and granting a user the role-based administration security role of Remote Tools Operator?
The Permitted Viewers List grants an administrative user the Remote Control permission for a computer, and the role-based administration security role of Remote Tools Operator grants an administrative user the ability to connect a Configuration Manager console to a site so that audit messages are sent when they manage computers by using remote control.
49. Can I send a CTRL+ALT+DEL command to a computer during a remote control session?
Yes. In the Configuration Manager remote control window, click Action, and then click Send Ctrl+Alt+Del.
50. How can I find out how the Help Desk is using remote control?
You can find this out by using the remote control reports: Remote Control – All computers remote controlled by a specific user and Remote Control – All remote control information
51. What happened to the Remote Control program in Control Panel on Configuration Manager clients?
The remote control settings for System Center 2012 Configuration Manager clients are now in Software Center, on theRemote Access tab.
52. What is a limiting collection and why would I use it?
In System Center 2012 Configuration Manager, all collections must be limited to the membership of another collection. When you create a collection, you must specify a limiting collection. A collection is always a subset of its limiting collection.
53. Can I include or exclude the members of another collection from my collection?
Yes. System Center 2012 Configuration Manager includes two new collection rules, the Include Collections rule and theExclude Collections rule that allow you to include or exclude the membership of specified collections.
54. Are incremental updates supported for all collection types?
No. Collections configured by using query rules that use certain classes do not support incremental updates.
55. Can you change a secondary site to a primary site?
No. A secondary site is always a secondary site. It cannot be upgraded, moved, or changed without deleting it and reinstalling it. If you delete and reinstall, you lose all secondary site data.
56. Can you distribute a package to a computer without making it a member of a collection?
No. To distribute software you must have a package, a program and an advertisement. Advertisements can only be sent to collections, not to computers. If you want to distribute a package to a single computer, you must create a collection for that computer.
57. What is Secondary Site?
Four Main characteristics:
· A Secondary Site does not have access to a Microsoft SQL Database
· Secondary Sites are ALWAYS a Child Site of a Primary Site and can only be administered via a Primary Site
· Secondary Sites cannot have Child Sites of their own
· Clients cannot be assigned directly to the Site
58. What is CENTRAL SITE?
A Central Site is a Configuration Manager Primary Site that resides at the top of the Configuration Manager hierarchy. All Database information rolls from the child to the parent and is collected by the Central Site’s Configuration Manager Database. The Central Site can administer any site below it in the hierarchy and can send data down to those sites as well.
What is PRIMARY SITE?
What is PRIMARY SITE?
Four main characteristics:
· The Site has access to a Microsoft SQL Server Database
· Can administer or be administered via the Configuration Manager Console
· It can be a child of other Primary Sites and can have Child Sites of its own
· Clients can be assigned directly to the Site
59. How do you install and configure Secondary site server
http://exchangeserverinfo.com/2008/05/02/installation-and-configuration-of-secondary-site-server.aspx
60. How do you create a package for Adobe?
the command line msiexec.exe /q ALLUSERS=2 /m MSIHPSJR /i AcroRead.msi" TRANSFORMS=mytransform.mst
61. How do you distribute a package?
· create a package in SCCM, pointing it to the installation sources, and in the package create an install program (you may have already done this?)
· assign Distribution Points to your package so the contents get synched.
· create a Collection containing the objects (users/computers) that are allowed to receive the package.
· create an Advertisement for the distribution, linking the package you created to the collection, decide whether the Adverisement is mandatory (installation enforced) or not (users have to go to the "Run Advertised Programs" dialog in Windows and select to install the program)
62. How SCCM download the patches?
You need to add the Software Update Point site role to the site, configure the software update point as active, configure the products, classifications, sync settings, etc. in the Software Update Point properties. THEN, you can go to the Update Repository node and run the Run Synchronization action from the central primary site. Once synchronization completes, you will see the metadata in the Configuration Manager console.
63. How do you configure the SUP?
In the Configuration Manager console, navigate to System CenterConfiguration Manager / Site Database /Site Management / <site code> - <site name> / Site Settings / Site Systems
Right-click the site system server name, and then click New Roles.
Select Software update point, and then click Next.
Specify whether the site server will use a proxy server when connecting to the software update point, and then clickNext.
Select Use this server as the active software update point, and then specify the port settings configured for the WSUS Web site on this site system.
Specify the synchronization source for the active software update point using one of the following settings: like Synchronize from Microsoft Update or Synchronize from an upstream update server
Keep the default setting Do not create WSUS reporting events, and then click Next
Specify whether to synchronize software updates on a schedule by selecting Enable synchronization on a schedule
Specify the update classifications for which the software updates will be synchronized, and then click Next.
Specify the products for which the software updates will be synchronized, and then click Next.
Open SUPSetup.log in <InstallationPath>Logs to monitor the installation progress for the software update point. When the installation completes, Installation was successful is written to the log file.
Open WCM.log in <InstallationPath>Logs to verify that the connection to the WSUS server was successful.
64. How do you Backup SCCM Server?
To create a scheduled backup task, expand the Site Settings node and expand the Site Maintenance node, click on Tasks.
For Manual backup - Start SMS_SITE_BACKUP service
65. What are the client deployments methods?
Client Push Installation, Software update point based installation, Group Policy Installation, Logon Script Installation, Manual Installation, Upgrade Installation (software Distribution)
66. Can you discover clients those are in different AD forest?
Yes.
Internet-based client management, which supports the following site systems installed in a separate forest to the site server:
Management point
Distribution point
Software update point
Fallback status point
Internet-based client management, which supports the following site systems installed in a separate forest to the site server:
Management point
Distribution point
Software update point
Fallback status point
67. What are the prerequisite for Software Update Point?
Windows Server Update Services (WSUS) 3.0, WSUS 3.0 Administration Console, Windows Update Agent (WUA) 3.0,Site server communication to the active software update point, Network Load Balancing (NLB),Background Intelligent Transfer Server (BITS) 2.5,Windows Installer
68. What is SMS Provider?
The SMS Provider is a WMI provider that allows both read and write access to the Configuration Manager 2007 site database. The SMS Provider is used by the Configuration Manager console
The SMS Provider can be installed on the site database server computer, site server computer or another server class third computer during Configuration Manager 2007 Setup. After setup has completed, the current installed location of the SMS Provider is displayed on the site properties general tab
69. What is ITMU?
SMS 2003 Inventory Tool for Microsoft Updates
What is the use of WSUS (Windows Server Update Service)?
It enables administrators to deploy the latest Microsoft product updates to computers that are running the Windows operating system.
70. Difference between SMS 2003 and SCCM 2007
What's New
ConfigMgr includes the following new features:
Desired Configuration Management (DCM) - This feature allows you to define a baseline configuration against which you compare configurations and report on to identify non-compliance or "configuration drift" as it's otherwise known.
Network Access Protection (NAP) - This feature leverages Windows 2008 NAP to control which machines have access to your network. If a machine doesn't meet the requirements you set (for example OS, Service Pack, Patch level, etc.), it cannot access your network until it does. The remediation can be performed by ConfigMgr automatically if required. Once a machines does meet the requirements it can access the network as normal.
Wake-On-LAN (WOL) - Allows a Magic Packet to be sent to a machine to wake up ready to receive software updates, Advertisements or Task Sequences rather than waiting until the next time the user turns on the machine.
Internet-based Client Management - As it's name suggests the ability to manage machines connected via the Internet rather than directly to your corporate network (be if through an intranet or VPN connection).
Integration with Windows Server Update Services (WSUS) 3.0 for Patch Management - ConfigMgr now leverages WSUS and it's catalog (which can also include 3rd party updates), for Patch Management. Once updates are approved they can be deployed via the new Software Updates Client Agent by means of a deployment package rather than Advertisements as before.
· Two Site Modes:
- Mixed Mode - For backwards compatibility with hierarchies containing SMS 2003 Sites OR those that don't have PKI installed.
o Native Mode - More secure as uses PKI and allows Internet-Based Client Management.
· Improved Security - As well as allowing the local system and computer accounts to be used to run services, connect between Sites and Site Systems, perform Client-based functions ConfigMgr can use an existing Public Key Infrastructure (PKI) to further increase security for site-to-site and site-to-client communications.
· Full support for Fully Qualified Domain Names (FQDNs) and IPv6
· Clients send new State Messages based on the state of a process at a given time of changes to their state (compared to Status Messages which provide information relating to data flow and component behaviour).
· A new improved version of the Administrator Console. The console is now split into three areas like Microsoft Outlook:
- Console Tree (left hand side) for navigation
- Results pane (middle) displays charts, objects, stats, etc. depending on the node selected in the Console Tree.
o Actions pane (right) displaying actions relevant to the node selected in the Console Tree.
· Introduction of several new Site System Roles:
- Branch Distribution Point (BDP)
- Fallback Status Point (FSP)
- Pre-boot Execution Environment (PXE) Service Point
- Software Update Point (SUP)
- State Migration Point (SMP)
- System Health Validator Point (SHVP)
· Support for hosting the Site Database on a clustered SQL Server virtual instance or SQL Server 2005 named instances.
· New Software Update Point Client installation method.
- Boundaries can be defined based on IPv6 Prefix (as well as AD Site, IP subnet, and IP range as in SMS 2003).
- "Maintenance Windows" - a new feature of Collections that allow you to control a time window during which changes can be made to members of the Collection.
- Support for upgrading from the Evaluation Version to the Full Version of the product without having to re-install/ reconfigure everything.
What's Changed
There have been several changes from SMS 2003 to ConfigMgr including:
Feature Packs that used to be separate add-ons in SMS 2003 are now incorporated into the core ConfigMgr product (for example the Administration Feature Pack, Device Management Feature Pack, Operating System Deployment Feature Pack Update). Improvements/ enhancements to Feature Packs include:
Operating System Deployment (OSD) - Images created in Windows IMage (WIM) format can be deployed (including any required applications), using bootable media such as CD/ DVD. One or more tasks can be created and combined to create a Task Sequence to control and customise the deployment of the image and Software Distribution actions.
- Mobile Device Management - The ability to manage Windows CE and Windows Mobile devices in the same way as regular ConfigMgr Clients (such as Hardware and Software Inventory, Software Distribution, Software Updates, and of course Windows Mobile settings).
- Transfer Site Settings Wizard - Allows the settings from one ConfigMgr Site to be transferred to another to save the admin having to reconfigure the settings on every Site. Settings covered by the wizard include Client Agent configuration, Discovery Method configuration, Package and Collection properties amongst others.
- Manage Site Accounts Tool (MSAC.exe) - A command line tool used to create, list, verify, update and delete user-defined accounts for use by ConfigMgr.
- All Site Servers and Site Systems must be a member of an AD Domain.
- Primary Sites only support Windows Authentication for the Site Database.
- Asset Intelligence introduced as an optional component in SMS 2003 SP3 is now included in the core product.
NOTE: As a result of the above two changes the core product requires a greater amount of server resources.
- Major changes to the way Backup and Recovery works - Volume Shadow Copy Service (VSS), available with XP, Windows 2003 and later OSs allowing a capture of a ConfigMgr Site to be made and stored on other media.
- Improved Remote Tools integration with Remote Desktop and Assistance - RDP is now used to communicate with XP, Vista and Windows 2003 (or later) Clients (Windows 2000 machines use a modified version of the SMS 2003 Remote Tools Client Agent). Remote Reboot, Chat, File Transfer, Remote Execute, Ping and Windows 98 diags are no longer available in ConfigMgr.
- Minor improvements to Collections, Software Distribution and Software Metering compared to SMS 2003.
- Senders can only now be installed on Primary or Secondary Site Servers.
- Only one Client type (basically the SMS 2003 Advanced Client so no Legacy Clients).
- Only a single Security mode (similar to SMS 2003 Advanced Security mode).
- The Site Server's local boundary is no longer automatically configured as a Site Boundary - you need to define this post installation.
- Site Boundaries are no longer supported - only Roaming Boundaries are with a choice of "Slow or unreliable" or "Fast (LAN)".
- Client Push uses the Site Code of the Primary rather than being set to "Auto" as in SMS 2003.
What's the Same
|
|
Some things have remained the same or have changed very little in ConfigMgr compared to SMS 2003:
|
71. What is WMI (Windows Management Instrumentation)?
You can write WMI scripts or applications to automate administrative tasks on remote computers
72. What is SUP (Software Update Point)?
This is required component of software updates, and after it is installed, the SUP is displayed as a site system role in the Configuration Manager console. The software update point site system role must be created on a site system server that has Windows Server Update Services (WSUS) 3.0 installed.
You want specific usersgroups to run specific custom reports. What should you do?
Navigate to “System Center Configuration Manager – Site Database – Security Rights – Users”
Right click on “Users” and select “Manage ConfigMgr Users”
Navigate to the “SCCM Support” group you created earlier
For “Collection” – “(All Instances)” add the following:
- “Delete resource”
- “Modify resource”
- “Read”
- “Read resource”
- “Use remote tools”
1. For “Report” – “(All Instances)” add the following:
- “Read”
- “Read”
2. For “Computer association” – “(All Instances)” add the following:
- “Create”
- “Delete”
- “Read”
- “Recover user state”
- “Create”
- “Delete”
- “Read”
- “Recover user state”
3. Click “Next”
4. Click “Next”
5. Click “Close”
You have been provided with permissions on the SCCM console to create, distribute, modify and delete packages? However, when distributing a package there is no Distribution points listed in the Distribution Point Wizard. What should you do?
To designate a distribution point on a new server or server share
To designate a distribution point on a new server or server share
1. In the Configuration Manager console, navigate to System Center Configuration Manager / Site Database / Site Management / <site name> / Site Settings.
2. Right-click Site Systems, point to New, and then click Server or Server Share, depending on which you want to create.
3. If you are creating a new server, use the New Site System Server Wizard to create the site system server, and select the Distribution Point check box from the Available Roles on the System Role Selection page to designate this server as a distribution point.
73. What are the required ports used by Configuration Manager?
http://technet.microsoft.com/en-us/library/bb632618.aspx
http://technet.microsoft.com/en-us/library/bb632618.aspx
74.What are FSMO Roles?
Windows 2000/2003 Multi-Master Model
A multi-master enabled database, such as the Active Directory, provides the flexibility of allowing changes to occur at any DC in the enterprise, but it also introduces the possibility of conflicts that can potentially lead to problems once the data is replicated to the rest of the enterprise. One way Windows 2000/2003 deals with conflicting updates is by having a conflict resolution algorithm handle discrepancies in values by resolving to the DC to which changes were written last (that is, "the last writer wins"), while discarding the changes in all other DCs. Although this resolution method may be acceptable in some cases, there are times when conflicts are just too difficult to resolve using the "last writer wins" approach. In such cases, it is best to prevent the conflict from occurring rather than to try to resolve it after the fact.
For certain types of changes, Windows 2000/2003 incorporates methods to prevent conflicting Active Directory updates from occurring.
Windows 2000/2003 Single-Master Model
To prevent conflicting updates in Windows 2000/2003, the Active Directory performs updates to certain objects in a single-master fashion.
In a single-master model, only one DC in the entire directory is allowed to process updates. This is similar to the role given to a primary domain controller (PDC) in earlier versions of Windows (such as Microsoft Windows NT 4.0), in which the PDC is responsible for processing all updates in a given domain.
In a forest, there are five FSMO roles that are assigned to one or more domain controllers. The five FSMO roles are:
Schema Master:
The schema master domain controller controls all updates and modifications to the schema. Once the Schema update is complete, it is replicated from the schema master to all other DCs in the directory. To update the schema of a forest, you must have access to the schema master. There can be only one schema master in the whole forest.
Domain naming master:
The domain naming master domain controller controls the addition or removal of domains in the forest. This DC is the only one that can add or remove a domain from the directory. It can also add or remove cross references to domains in external directories. There can be only one domain naming master in the whole forest.
Infrastructure Master:
When an object in one domain is referenced by another object in another domain, it represents the reference by the GUID, the SID (for references to security principals), and the DN of the object being referenced. The infrastructure FSMO role holder is the DC responsible for updating an object's SID and distinguished name in a cross-domain object reference. At any one time, there can be only one domain controller acting as the infrastructure master in each domain.
Note: The Infrastructure Master (IM) role should be held by a domain controller that is not a Global Catalog server (GC). If the Infrastructure Master runs on a Global Catalog server it will stop updating object information because it does not contain any references to objects that it does not hold. This is because a Global Catalog server holds a partial replica of every object in the forest. As a result, cross-domain object references in that domain will not be updated and a warning to that effect will be logged on that DC's event log. If all the domain controllers in a domain also host the global catalog, all the domain controllers have the current data, and it is not important which domain controller holds the infrastructure master role.
Relative ID (RID) Master:
The RID master is responsible for processing RID pool requests from all domain controllers in a particular domain. When a DC creates a security principal object such as a user or group, it attaches a unique Security ID (SID) to the object. This SID consists of a domain SID (the same for all SIDs created in a domain), and a relative ID (RID) that is unique for each security principal SID created in a domain. Each DC in a domain is allocated a pool of RIDs that it is allowed to assign to the security principals it creates. When a DC's allocated RID pool falls below a threshold, that DC issues a request for additional RIDs to the domain's RID master. The domain RID master responds to the request by retrieving RIDs from the domain's unallocated RID pool and assigns them to the pool of the requesting DC. At any one time, there can be only one domain controller acting as the RID master in the domain.
PDC Emulator:
The PDC emulator is necessary to synchronize time in an enterprise. Windows 2000/2003 includes the W32Time (Windows Time) time service that is required by the Kerberos authentication protocol. All Windows 2000/2003-based computers within an enterprise use a common time. The purpose of the time service is to ensure that the Windows Time service uses a hierarchical relationship that controls authority and does not permit loops to ensure appropriate common time usage.
The PDC emulator of a domain is authoritative for the domain. The PDC emulator at the root of the forest becomes authoritative for the enterprise, and should be configured to gather the time from an external source. All PDC FSMO role holders follow the hierarchy of domains in the selection of their in-bound time partner.
In a Windows 2000/2003 domain, the PDC emulator role holder retains the following functions:
· Password changes performed by other DCs in the domain are replicated preferentially to the PDC emulator.
· Authentication failures that occur at a given DC in a domain because of an incorrect password are forwarded to the PDC emulator before a bad password failure message is reported to the user.
· Account lockout is processed on the PDC emulator.
· Editing or creation of Group Policy Objects (GPO) is always done from the GPO copy found in the PDC Emulator's SYSVOL share, unless configured not to do so by the administrator.
· The PDC emulator performs all of the functionality that a Microsoft Windows NT 4.0 Server-based PDC or earlier PDC performs for Windows NT 4.0-based or earlier clients.
This part of the PDC emulator role becomes unnecessary when all workstations, member servers, and domain controllers that are running Windows NT 4.0 or earlier are all upgraded to Windows 2000/2003. The PDC emulator still performs the other functions as described in a Windows 2000/2003 environment.
74. What is Mixed and Native Mode Installation?
At any one time, there can be only one domain controller acting as the PDC emulator master in each domain in the forest.
Choose native mode if any of the following conditions apply:
· You require the highest security controls, using industry-standard protocols.
· You require Internet-based client management.
Choose mixed mode if any of the following conditions apply:
· You do not have the supporting public key infrastructure (PKI).
· You have not installed the specific certificates required by Configuration Manager 2007.
· The site contains SMS 2003 clients.
· The site contains clients running Windows 2000 Professional or Windows Server 2000.
· The parent site is configured for mixed mode.
· Site systems running Internet Information Services (IIS) are not dedicated to Configuration Manager, and you cannot configure a custom website.
· You must use WINS as the means by which clients can find their default management point (service location).
· You do not want the site's secondary sites to be automatically migrated.
Advantages and Disadvantages of the Two Site Modes
If you cannot choose the site mode based on these conditions, consider the advantages and disadvantages of both site modes to best meet your business requirements.
The following table outlines the advantages and disadvantages of native-mode and mixed-mode site configuration to help you choose which site mode to configure.
|
Site Mode
|
Advantage
|
Disadvantage
|
|
Native Mode
|
More secure solution than mixed mode because it provides better authentication, encryption, and signing by using standard industry security protocols.
Supports Internet-based client management.
More secure service location because does not use WINS as the means by which clients locate their default management point. In this scenario, blocking WINS as a service location mechanism provides additional security, although you must ensure that other service location mechanisms are configured and working.
Can integrate with existing PKI deployment, and the security controls can be managed independently from the product.
|
Requires a PKI deployment and specific certificates.
The parent site (if applicable) must be in native mode.
Clients that roam into this site from a mixed-mode site will not be able to download content from the site's distribution points.
Must configure a custom website if the site systems running Internet Information Services (IIS) are not dedicated to Configuration Manager.
Might require registering fully qualified domain names (FQDNs) in DNS (FQDNs are a requirement for Internet-based client management, and recommended for native mode on the intranet).
If a mixed-mode client roams into the site, it will not be able to download local content.
|
|
Mixed Mode
|
Does not require a PKI deployment, so it has no external dependencies.
Supports clients running SMS 2003.
Supports WINS as a fallback service location mechanism for clients to locate their default management point if Active Directory Domain Services and DNS cannot be used. In this scenario, WINS provides service location convenience and resilience, although using WINS for service location is less secure than using Active Directory Domain Services or DNS.
|
Provides less comprehensive signing, encryption, and authentication.
Does not support Internet-based client management.
Requires approval of clients before they can receive policies that might contain sensitive data.
Clients that roam into this site from a native mode site will not be able to download local content unless their site is configured with the option: Allow HTTP Communication for Roaming and Site Assignment.
|
75. How to Migrate the Site Mode from Mixed Mode to Native Mode?
You should not migrate the site mode from mixed mode to native mode until you are sure the site is correctly provisioned with the following:
- The required public key infrastructure (PKI) certificates.
- A custom Web site if the default Web sites are being used for anything other than Configuration Manager 2007
- You have verified that there are no SMS 2003 clients assigned to the site and the site does not contain clients running Microsoft Windows 2000 Professional
- Additionally, if the site contains clients that cannot read site settings published in Active Directory Domain Services, you must also have the following in place:
- An external mechanism such as Group Policy or a script to instruct clients to migrate over to native mode communication.
- A server locator point for the hierarchy if you are using a network load balanced management point.
- An external mechanism such as Group Policy or a script to run CCMSetup.exe with command-line options if you need to configure clients with the client settings specified in the Site Properties: Site Mode Tab. These options are the following:
- Enable CRL checking on clients
- Allow HTTP communication for roaming and site assignment
- Certificate store
- Certificate selection criteria
It is optional, but recommended, that you have a fallback status point installed in the site and that clients are assigned to it. The fallback status point can help you identify clients that cannot communicate with their management point (and so are unmanaged) when the site is operating in native mode.
|
|
|
The migration process that Configuration Manager 2007 undergoes when you perform this procedure can take some time to complete, and for a sustained period of time, clients might not be able to communicate with the site. Therefore, plan to perform this procedure during a quiet period when it is acceptable that the site will be unavailable because of maintenance downtime.
|
To migrate the site mode from mixed mode to native mode:
1. In the Configuration Manager console, navigate to System CenterConfiguration Manager / Site Database / Site Management.
2. Right-click <site code> -<site name> and then click Properties.
3. On the Site Mode tab in the site properties dialog box, select Native mode.
4. In the Site server signing certificate section, click Browse to view the available certificates on the site server's local store in the Available Certificatesdialog box. Select the site server signing certificate that contains the site code in the Issued to field and includes Document Signing in the Intended Purpose field. Then click OK to close the Available Certificates dialog box.
5. If you are unable to browse to the site server's certificate store, you can manually enter the certificate's thumbprint in the Thumbprint text box. Configuration Manager will attempt to match the thumbprint to a certificate, and if this is successful, the certificate friendly name will be displayed in the Thumbprint field. If Configuration Manager is unable to match the thumbprint to a certificate, you will be prompted to choose whether you want to continue.
6. When you have either selected the certificate or entered the thumbprint, click OK to close the site properties dialog box.
76. What is Deployment Share?
A deployment share is a repository for the operating system images, language packs, applications, device drivers, and other software that will be deployed to your target computers. Deployment shares are new in MDT 2010 and consolidate two separate features found in MDT 2008:
· Distribution share Contains operating system source files, applicationsource files, packages, and out-of-box drivers.
· Deployment point Contains files needed to connect to the distribution share and install a build from it.
By consolidating these two separate features into a single feature (the deployment share), MDT 2010 simplifies the deployment process. In addition, a deployment share does not have to be located on a specific computer-it can be stored on a local disk volume, a shared folder on the network, or anywhere in a stand-alone Distributed File System (DFS) namespace. (Windows PE cannot access domain-based DFS namespaces.)
Note See the Microsoft Deployment Toolkit 2010 Documentation Library for information on how to upgrade to MDT 2010 from previous versions of MDT or Business Desktop Deployment (BDD). After you upgrade to MDT 2010, you must also upgrade any deployment points created using the previous version of MDT or BDD.
To create a new deployment share, perform the following steps:
1. In the Deployment Workbench console tree, right-click Deployment Shares and then click New Deployment Share.
2. On the Path page, specify the path to the folder for your deployment share. The default path is <drive>DeploymentShare, where <drive> is the volume with the most available space. For best performance, you should specify a path to a separate physical disk that has sufficient free space to hold the operating system source files, application source files, packages, and out-of-box drivers you use for your deployments.
3. On the Share page, specify the share name for the deployment share. By default, this will be a hidden share named DeploymentShare$.
4. On the Descriptive Name page, specify a descriptive name for the deployment share. By default, this will be MDT Deployment Share.
5. On the Allow Image Capture page, leave the Ask If An Image Should Be Captured option selected so you will be able to capture an image of your reference computer.
6. On the Allow Admin Password page, choose whether the user will be prompted to set the local Administrator password during installation.
7. On the Allow Product Key page, choose whether the user will be prompted to enter a product key during installation.
8. Finish the remaining steps of the wizard.
Once your deployment share has been created, you can view the hierarchy of folders under it in the Deployment Workbench.
Note The default view in Deployment Workbench includes the action pane. The action pane often gets in the way of viewing the entire details pane. You can remove the action pane by authoring the management console. To author the console, run C:Program Files Microsoft Deployment ToolkitBinDeploymentWorkbench.msc /a. Click View, click Customize, clear the Action Pane check box, and then click OK. Save your changes by clicking File and then clicking Save on the main menu. When prompted whether you want to display a single window interface, click Yes.
After creating a deployment share, you can configure it in the following ways (at minimum, you must add the Windows 7 source files to deploy Windows 7):
· Add, remove, and configure operating systems.
· Add, remove, and configure applications.
· Add, remove, and configure operating system packages, including updates and language packs.
· Add, remove, and configure out-of-box device drivers.
When you add operating systems, applications, operating system packages, and out-of-box device drivers to a deployment share, Deployment Workbench stores the source files in the deployment share folder specified when you create the deployment share. You will associate these source files and other files with task sequences later in the development process.
In the distribution share's Control folder, Deployment Workbench stores metadata about operating systems, applications, operating system packages, and out-of-box device drivers in the following files:
· Applications.xml Contains metadata about applications in the distribution share
· Drivers.xml Contains metadata about device drivers in the distribution share
· OperatingSystems.xml Contains metadata about operating systems in the distribution share
· Packages.xml Contains metadata about operating system packages in the distribution share
77. Client Communication in Mixed Mode and Native Mode?
Client-to-Server Communication Within a Site
The following table displays the change of protocol communication from HTTP to HTTPS for the different site modes when a client is communicating with site systems in its assigned site.
|
Site System
|
Mixed Mode
|
Native Mode
|
|
Management point
|
HTTP
|
HTTPS
|
|
Standard distribution point
|
HTTP
|
HTTPS
|
|
Software update point
|
HTTP or HTTPS
|
HTTPS
|
|
State migration point
|
HTTP
|
HTTPS
|
|
Fallback status point
|
HTTP
|
HTTP
|
|
Server locator point
|
HTTP
|
HTTP
|
|
|
|
In native mode, client computers must be configured for HTTP communication for roaming and site assignment to communicate with a server locator point. If native-mode client computers are not configured with this option, they cannot communicate with a server locator point in native mode. Mobile device clients do not communicate with a server locator point, and do not support roaming capability.
|
The following picture shows this change of protocol communication from HTTP to HTTPS for the different site modes when a client is communicating with site systems in its assigned site.
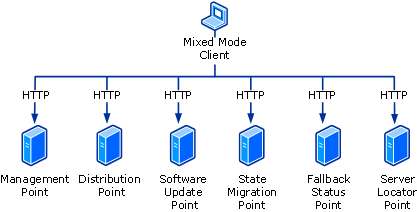

The following site system communications are not affected by the by site mode, because these are initiated by the Microsoft Windows operating system or browser rather the Configuration Manager 2007 client:
- System Health Validator point: The computer sends statement of health messages to the System Health Validator point, using the Network Access Protocol communication established with the Network Policy Server.
- PXE Service point: The computer uses the PXE protocol to boot the computer and install an operating system.
- Reporting point: The computer uses the selected Web browser to connect to the reporting point. You can configure the reporting point for HTTP or HTTPS independently from the site mode.
Additionally, branch distribution points will always use the server message block (SMB) protocol in both mixed mode and native mode, and standard distribution points will also use SMB if they are not configured with the following option: Allow clients to transfer content from this distribution point using BITS, HTTP, and HTTPS (required for device clients and Internet-based clients.
There are also some situations where clients can communicate with standard distribution points over SMB rather than HTTP or HTTPS, such as when advertisements are configured with the option Run program from distribution point, and also if HTTP fails in mixed mode or HTTPS fails on the intranet in native mode.
Client-to-Server Communication When Roaming Between Sites in Different Modes
When a mixed mode client roams into a native mode site, the mixed mode client will not be able to communicate with the resident native mode management point or with any native mode distribution points in that site. In this scenario, roaming does not work, and the client will communicate with its assigned management point and download content from distribution points in its own site.
When a native mode client computer roams into a mixed mode site, the behavior varies depending on whether the native mode client computer is configured for HTTP communication for roaming and site assignment. The following table displays this difference.
|
Site System
|
Client communication if HTTP communication for roaming and site assignment is not configured
|
Client communication if HTTP communication for roaming and site assignment is configured
|
|
Client’s assigned (native mode) management point
|
Yes, using HTTPS
|
Yes, using HTTPS
|
|
Client’s assigned site (native mode) distribution point
|
Yes, using HTTPS
|
Yes, using HTTPS
|
|
Mixed mode resident management point
|
No
|
Yes, using HTTP
|
|
Mixed mode distribution point
|
No
|
Yes, using HTTP
|
The following picture shows the roaming behavior for a native-mode client computer if the option for HTTP communication for roaming and site assignment is not configured.
The following picture shows the roaming behavior for a native-mode client computer if the option for HTTP communication for roaming and site assignment is configured.
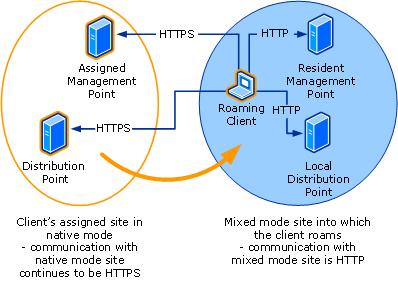

78. What is BDP? How Data Replicates?
A branch distribution is intended to allow smaller or distributed offices to host a Microsoft System Center Configuration Manager 2007 distribution point on an existing client computer without requiring a secondary site to be set up. Branch distribution points provide an option for efficient package distribution to a small office that has limited bandwidth.
Although a branch distribution point functions like a standard distribution point, it is not intended to replace the role of a site server or management point. Additionally, because a branch distribution point can be installed on a workstation, operating system limitations might require fewer than 10 simultaneous client connections.
Limited Network Bandwidth
To support possible bandwidth limitations, a branch distribution point can use the Background Intelligent Transfer Service (BITS) to limit network traffic when downloading packages. BITS allows administrators to control the transfer rates to the branch distribution point and provide a checkpoint restart of a package download. If a package download is interrupted or if the connection is lost as the result of slow or unreliable network connections, the download can continue at that point rather than restarting from the beginning of the download.
In addition to providing administrators with the ability to limit network traffic usage through BITS, branch distribution points also provide an option that allows packages to be downloaded to the branch distribution point only after the package has been specifically requested by a client, which allows more efficient bandwidth management.
Choose Between a Standard and Branch Distribution Point
Although they are not limited to installation in branch offices, Microsoft System Center Configuration Manager 2007 branch distribution points are specifically designed to support branch offices, which typically have fewer clients and use a slow network connection.
Configure a distribution point as a branch distribution point if any of the following conditions apply:
- You have a remote location connected to the main Configuration Manager 2007 site location by a slow connection and want to optimize software distribution to clients in that location without creating a primary or secondary site for that location.
- You do not have a computer running Windows Server 2003 that can function as a distribution point in a branch location, but you want to allow clients in that office to access content from a local distribution point.
- You want to use a client operating system to provide the distribution point function and do not need more than the supported number of concurrent connections (for example, 10 concurrent connections for Windows XP and Windows Vista, and 20 concurrent connections for Windows 7).
- You want the package to be copied to the distribution point only when a client actually requests to install the package.
- Do not configure a distribution point as a branch distribution point if any of the following conditions are true:
- The computer does not yet have the Configuration Manager 2007 client installed or it is not assigned to the site.
- You have not yet configured one standard distribution point for the branch distribution point to retrieve content.
- The computer needs to roam between Configuration Manager 2007 sites.
- The computer is an Internet-based client.
- The distribution point must provide content to Internet-based clients.
- The distribution point is a server share instead of a server.
- The distribution point must support mobile device clients.
- The computer is running Windows 2000 Server or Windows 2000 Workstation
- The computer is not joined to an Active Directory domain.
- The computer is likely to be turned off when Configuration Manager 2007 needs to process advertisements. For example, if an end user uses the branch distribution point as a workstation, you must educate the user not to shut down the computer when it might be needed by other users in the office.
- You want clients to download content from the distribution point using Background Intelligent Transfer Service (BITS).
|
|
|
Configuring a distribution point for BITS does not guarantee that the download will use BITS. However, clients always use server message blocks (SMBs) when communicating with a branch distribution point, even when the site is configured for native mode. Branch distribution points download their content using BITS from a BITS-enabled distribution point, but they cannot be BITS-enabled themselves.
|
- You want to use multicast with operating system deployment in Configuration Manager 2007 R2.
To deploy a branch distribution point
1. In the Configuration Manager console, navigate to System CenterConfiguration Manager / Site Database / Site Management / <site name> / Site Settings.
2. Right-click Site Systems, point to New, and then click Server.
3. Use the New Site System Server Wizard to deploy the branch distribution point on the specific client on which you want to install it.
- On the System Role Selection page, select the Distribution Point role.
- On the Distribution Point page, select the Enable as a branch distribution point option. If you want to limit the branch distribution point installation and package files to a specific partition on the client computer or if you want to reserve a specific amount of disk space for the operating system or workstation files, you can set those preferences on this page.
To remove a branch distribution point
1. Remove all distribution package folders and the SMSPKGSIG signature folder from the branch distribution point computer.
|
|
|
You must manually remove these components before removing the branch distribution point role.
|
2. In the Configuration Manager console, navigate to System CenterConfiguration Manager / Site Database / Site Management / <site name> / Site Settings / Site Systems.
3. Click the specific branch distribution point to be removed.
4. Right-click the ConfigMgr distribution point role in the results pane, and then click Delete.
5. Click Yes in the Confirm Delete dialog box.
79. Difference between Protected and Unprotected Distribution Point?
Protecting a Microsoft System Center Configuration Manager 2007 site system means that clients outside of the protected boundaries will not be able to access the distribution point or state migration point roles on that site system. Protection is applied to the entire site system, not to the properties of the site role. However, protection has no effect on any site system roles except distribution points and state migration points.
Fallback to Unprotected Distribution Points
Protecting the distribution point does not necessarily prevent clients inside the protected boundaries from accessing content from an unprotected distribution point. If the package is not present on a protected distribution point, the client might fall back to using an unprotected distribution point, depending on how you configure your advertisement for each package and how much time has elapsed. If the distribution point has been offline or has not been provisioned for more than eight hours, and if you select the setting Allow clients to fallback to unprotected distribution points when the content is not available on the protected distribution point, clients can receive content from unprotected distribution points.
The following table shows the how the advertisement configuration works depending on whether the content is available on the protected distribution point.
|
Scenario
|
Option: Do not allow clients to fall back to unprotected distribution points when the content is not available on the protected distribution point.
|
Option: Allow clients to fall back to unprotected distribution points when the content is not available on the protected distribution point.
|
|
At least one distribution point meets the following criteria:
· Is added to the package
· Is in the protected boundary of the client
· Is online and accessible
· Is either a standard or a branch distribution point
|
Only protected distribution points are returned. The client downloads the package from the protected distribution point.
|
Protected distribution points are returned if the content is present on the distribution point.
If the content is not present on the distribution point, any unprotected distribution points that contain the content are returned.
If no unprotected distribution points contain the content, the client fails with the message "Content is not available."
|
|
· One or more standard distribution points meet the following criteria:
o Is in the protected boundary of the client
o Is online and accessible
· The protected standard distribution points are not added to the package.
· No branch distribution points are in the protected boundary of the client.
|
No distribution points are returned. The client fails with the message "Content is not available."
|
Any unprotected distribution points that contain the content are returned.
If no unprotected distribution points contain the content, the client fails with the message "Content is not available."
|
|
· One or more branch distribution point meet the following criteria:
o Is in the protected boundary of the client
o Is online and accessible
· The protected branch distribution points are not added to the package.
· The package is configured for on-demand package distribution.
|
The management point sends a message to Distribution Manager to add the protected branch distribution point to the package.
The client downloads the package from the protected branch distribution point.
When the next client in the boundaries of the protected distribution point requests content location, the protected branch distribution point is returned.
|
The management point sends a message to Distribution Manager to add the protected branch distribution point to the package. Future content location requests should return the protected branch distribution point.
If the content is not present on the protected branch distribution point, any unprotected distribution points that contain the content are returned.
The client downloads the package from either the protected branch distribution point or the unprotected distribution point.
|
|
· One or more branch distribution points meet the following criteria:
o Is in the protected boundary of the client
o Is online and accessible
· The protected branch distribution points are not added to the package.
· The package is not configured for on-demand package distribution.
· No standard distribution points are in the protected boundary of the client.
|
No distribution points are returned. The client fails with message "Content is not available."
|
No distribution points are returned. The client fails with the message "Content is not available."
|
|
· The distribution point meets the following criteria:
o Is added to the package
o Is in the protected boundary of the client
o Is either a branch or a standard distribution point
· The distribution point is not online and accessible.
|
Only protected distribution points are returned. After eight hours, the client fails with the message "Content is not available."
|
Only protected distribution points are returned. After eight hours, the client fails with the message "Content is not available."
|
Examples
In the following diagram, the subnet 192.168.11.0 is in a branch office in Naperville but is part of the Chicago site. The branch distribution point in the branch office is protected so that only clients in 192.168.11.0 can access it. The standard distribution point in the main office is not protected. Clients on the network 192.168.10.0 cannot access packages on the protected branch distribution point on 192.168.11.0. The default configuration for an advertisement is to Allow clients to fallback to unprotected distribution points when the content is not available on the protected distribution point. So clients on the 192.168.11.0 network can get the package from either distribution point. If you change the setting, the clients in 192.168.11.0 will attempt to retrieve the package only from the protected branch distribution point, even if the package has not been copied to that distribution point. (If you configure the package for on-demand package distribution, the management point will notify Distribution Manager to copy the package to the distribution point.) If a client from ORD roams to the LON site and an advertised package is not available on the LON distribution point, the client can fall back to using the distribution point on 192.168.10.0 (assuming the package is copied to that distribution point), but it can never access the protected distribution point because it is not on the 192.168.11.0 network.
It is possible to protect every distribution point in the site, but doing so eliminates the redundancy provided by multiple distribution points. In the following diagram, if the distribution point in Milpitas is unreachable, the clients in the Milpitas branch office cannot retrieve the content because all other distribution points are protected.
80. Log Files in SCCM?
· X:WINDOWSTEMPSMSTS (In WinPE environment X: is the boot image RAM Disk)
· C:_SMSTaskSequence
· C:SafeFolderLogs
· C:WINDOWSModena
· C:WINDOWSSystem32CCMLogs or C:WINDOWSSysWOW64CCMLogs
Client Log Files
· CAS - Content Access Service. Maintains the local package cache.
· Ccmexec.log - Records activities of the client and the SMS Agent Host service.
· CertificateMaintenance.log - Maintains certificates for Active Directory directory service and management points.
· ClientIDManagerStartup.log - Creates and maintains the client GUID.
· ClientLocation.log - Site assignment tasks.
· ContentTransferManager.log - Schedules the Background Intelligent Transfer Service (BITS) or the Server Message Block (SMB) to download or to access SMS packages.
· DataTransferService.log - Records all BITS communication for policy or package access.
· Execmgr.log - Records advertisements that run.
· FileBITS.log - Records all SMB package access tasks.
· Fsinvprovider.log (renamed to FileSystemFile.log in all SMS 2003 Service Packs) - Windows Management Instrumentation (WMI) provider for software inventory and file collection.
· InventoryAgent.log - Creates discovery data records (DDRs) and hardware and software inventory records.
· LocationServices.log - Finds management points and distribution points.
· Mifprovider.log - The WMI provider for .MIF files.
· Mtrmgr.log - Monitors all software metering processes.
· PolicyAgent.log - Requests policies by using the Data Transfer service.
· PolicyAgentProvider.log - Records policy changes.
· PolicyEvaluator.log - Records new policy settings.
· Remctrl.log - Logs when the remote control component (WUSER32) starts.
· Scheduler.log - Records schedule tasks for all client operations.
· Smscliui.log - Records usage of the Systems Management tool in Control Panel.
· StatusAgent.log - Logs status messages that are created by the client components.
· SWMTRReportGen.log - Generates a usage data report that is collected by the metering agent. (This data is logged in Mtrmgr.log.)
· Ccm.log - Client Configuration Manager tasks.
· Cidm.log - Records changes to the client settings by the Client Install Data Manager (CIDM).
· Colleval.log - Logs when collections are created, changed, and deleted by the Collection Evaluator.
· Compsumm.log - Records Component Status Summarizer tasks.
· Cscnfsvc.log - Records Courier Sender confirmation service tasks.
· Dataldr.log - Processes Management Information Format (MIF) files and hardware inventory in the Configuration Manager 2007 database.
· Ddm.log - Saves DDR information to the Configuration Manager 2007 database by the Discovery Data Manager.
· Despool.log - Records incoming site-to-site communication transfers.
· Distmgr.log - Records package creation, compression, delta replication, and information updates.
· Hman.log - Records site configuration changes, and publishes site information in Active Directory Domain Services.
· Inboxast.log - Records files that are moved from the management point to the corresponding SMSINBOXES folder.
· Inboxmgr.log - Records file maintenance.
· Invproc.log - Records the processing of delta MIF files for the Dataloader component from client inventory files.
· Mpcontrol.log - Records the registration of the management point with WINS. Records the availability of the management point every 10 minutes.
· Mpfdm.log - Management point component that moves client files to the corresponding SMSINBOXES folder.
· MPMSI.log - Management point .msi installation log.
· MPSetup.log - Records the management point installation wrapper process.
· Ntsvrdis.log - Configuration Manager 2007 server discovery.
· Offermgr.log - Records advertisement updates.
· Offersum.log - Records summarization of advertisement status messages.
· Policypv.log - Records updates to the client policies to reflect changes to client settings or advertisements.
· Replmgr.log - Records the replication of files between the site server components and the Scheduler component.
· Rsetup.log - Reporting point setup log.
· Sched.log - Records site-to-site job and package replication.
· Sender.log - Records files that are sent to other child and parent sites.
· Sinvproc.log - Records client software inventory data processing to the site database in Microsoft SQL Server.
· Sitecomp.log - Records maintenance of the installed site components.
· Sitectrl.log - Records site setting changes to the Sitectrl.ct0 file.
· Sitestat.log - Records the monitoring process of all site systems.
· Smsdbmon.log - Records database changes.
· Smsexec.log - Records processing of all site server component threads.
· Smsprov.log - Records WMI provider access to the site database.
· SMSReportingInstall.log - Records the Reporting Point installation. This component starts the installation tasks and processes configuration changes.
· SMSSHVSetup.log - Records the success or failure (with failure reason) of installing the System Health Validator point.
· Srvacct.log - Records the maintenance of accounts when the site uses standard security.
· Statmgr.log - Writes all status messages to the database.
· Swmproc.log - Processes metering files and maintains settings.
· RepairWizard.log - Records errors, warnings, and information about the process of running the Repair Wizard.
· ResourceExplorer.log - Records errors, warnings, and information about running the Resource Explorer.
· SMSAdminUI.log - Records the local Configuration Manager 2007 console tasks when you connect to Configuration Manager 2007 sites.
· MP_Ddr.log - Records the conversion of XML.ddr records from clients, and copies them to the site server.
· MP_GetAuth.log - Records the status of the site management points.
· MP_GetPolicy.log - Records policy information.
· MP_Hinv.log - Converts XML hardware inventory records from clients and copies the files to the site server.
· MP_Location.log - Records location manager tasks.
· MP_Policy.log - Records policy communication.
· MP_Relay.log - Copies files that are collected from the client.
· MP_Retry.log - Records the hardware inventory retry processes.
· MP_Sinv.log - Converts XML hardware inventory records from clients and copies them to the site server.
· MP_Status.log - Converts XML.svf status message files from clients and copies them to the site server.
· DmClientHealth.log - Records the GUIDs of all the mobile device clients that are communicating with the Device Management Point.
· DmClientRegistration.log - Records registration requests from and responses to the mobile device client in Native mode.
· DmpDatastore.log - Records all the site database connections and queries made by the Device Management Point.
· DmpDiscovery.log - Records all the discovery data from the mobile device clients on the Device Management Point.
· DmpFileCollection.log - Records mobile device file collection data from mobile device clients on the Device Management Point.
· DmpHardware.log - Records hardware inventory data from mobile device clients on the Device Management Point.
· DmpIsapi.log - Records mobile device communication data from device clients on the Device Management Point.
· dmpMSI.log - Records the MSI data for Device Management Point setup.
· DMPSetup.log - Records the mobile device management setup process.
· DmpSoftware.log - Records mobile device software distribution data from mobile device clients on the Device Management Point.
· DmpStatus.log - Records mobile device status messages data from mobile device clients on the Device Management Point.
· FspIsapi.log - Records Fallback Status Point communication data from mobile device clients and client computers on the Fallback Status Point.
· DmCertEnroll.log - Records certificate enrollment data on mobile device clients.
· DMCertResp.htm (in temp) - Records HTML response from the certificate server when the mobile device Enroller program requests a client authentication certificate on mobile device clients.
· DmClientSetup.log - Records client setup data on mobile device clients.
· DmClientXfer.log - Records client transfer data for Windows Mobile Device Center and ActiveSync deployments.
· DmCommonInstaller.log - Records client transfer file installation for setting up mobile device client transfer files on client computers.
· DmInstaller.log - Records whether DMInstaller correctly calls DmClientSetup and whether DmClientSetup exits with success or failure on mobile device clients.
· DmInvExtension.log - Records Inventory Extension file installation for setting up Inventory Extension files on client computers.
· DmSvc.log - Records mobile device management service data on mobile device clients.
· CCMSetup.log - Provides information about client-based operating system actions.
· CreateTSMedia.log - Provides information about task sequence media when it is created. This log is generated on the computer running the Configuration Manager 2007 administrator console.
· DriverCatalog.log - Provides information about device drivers that have been imported into the driver catalog.
· MP_ClientIDManager.log - Provides information about the Configuration Manager 2007 management point when it responds to Configuration Manager 2007 client ID requests from boot media or PXE. This log is generated on the Configuration Manager 2007 management point.
· MP_DriverManager.log - Provides information about the Configuration Manager 2007 management point when it responds to a request from the Auto Apply Driver task sequence action. This log is generated on the Configuration Manager 2007 management point.
· MP_Location.log - Provides information about the Configuration Manager 2007 management point when it responds to request state store or release state store requests from the state migration point. This log is generated on the Configuration Manager 2007 management point.
· Pxecontrol.log - Provides information about the PXE Control Manager.
· PXEMsi.log - Provides information about the PXE service point and is generated when the PXE service point site server has been created.
· PXESetup.log - Provides information about the PXE service point and is generated when the PXE service point site server has been created.
· Setupact.log Setupapi.log Setuperr.log Provide information about Windows Sysprep and setup logs.
· SmpIsapi.log - Provides information about the state migration point Configuration Manager 2007 client request responses.
· Smpmgr.log - Provides information about the results of state migration point health checks and configuration changes.
· SmpMSI.log - Provides information about the state migration point and is generated when the state migration point site server has been created.
· Smsprov.log - Provides information about the SMS provider.
· Smspxe.log - Provides information about the Configuration Manager 2007 PXE service point.
· SMSSMPSetup.log - Provides information about the state migration point and is generated when the state migration point site server has been created.
· Smsts.log - General location for all operating system deployment and task sequence log events.
· TaskSequenceProvider.log - Provides information about task sequences when they are imported, exported, or edited.
· USMT Log loadstate.log - Provides information about the User State Migration Tool (USMT) regarding the restore of user state data.
· USMT Log scanstate.log - Provides information about the USMT regarding the capture of user state data.
· Ccmcca.log - Logs the processing of compliance evaluation based on Configuration Manager NAP policy processing and contains the processing of remediation for each software update required for compliance.
· CIAgent.log - Tracks the process of remediation and compliance. However, the software updates log file, *Updateshandler.log - provides more informative details on installing the software updates required for compliance.
· locationservices.log - Used by other Configuration Manager features (for example, information about the client’s assigned site) but also contains information specific to Network Access Protection when the client is in remediation. It records the names of the required remediation servers (management point, software update point, and distribution points that host content required for compliance), which are also sent in the client statement of health.
· SDMAgent.log - Shared with the Configuration Manager feature desired configuration management and contains the tracking process of remediation and compliance. However, the software updates log file, Updateshandler.log, provides more informative details about installing the software updates required for compliance.
· SMSSha.log - The main log file for the Configuration Manager Network Access Protection client and contains a merged statement of health information from the two Configuration Manager components: location services (LS) and the configuration compliance agent (CCA). This log file also contains information about the interactions between the Configuration Manager System Health Agent and the operating system NAP agent, and also between the Configuration Manager System Health Agent and both the configuration compliance agent and the location services. It provides information about whether the NAP agent successfully initialized, the statement of health data, and the statement of health response.
· Ccmperf.log -Contains information about the initialization of the System Health Validator point performance counters.
· SmsSHV.log - The main log file for the System Health Validator point; logs the basic operations of the System Health Validator service, such as the initialization progress.
· SmsSHVADCacheClient.log - Contains information about retrieving Configuration Manager health state references from Active Directory Domain Services.
· SmsSHVCacheStore.log - Contains information about the cache store used to hold the Configuration Manager NAP health state references retrieved from Active Directory Domain Services, such as reading from the store and purging entries from the local cache store file. The cache store is not configurable.
· SmsSHVRegistrySettings.log - Records any dynamic changes to the System Health Validator component configuration while the service is running.
· SmsSHVQuarValidator.log - Records client statement of health information and processing operations. To obtain full information, change the registry key LogLevel from 1 to 0 in the following location:HKLMSOFTWAREMicrosoftSMSSHVLogging@GLOBAL
· ciagent.log - Provides information about downloading, storing, and accessing assigned configuration baselines.
· dcmagent.log - Provides high-level information about the evaluation of assigned configuration baselines and desired configuration management processes.
· discovery.log - Provides detailed information about the Service Modeling Language (SML) processes.
· sdmagent.log - Provides information about downloading, storing, and accessing configuration item content.
· sdmdiscagent.log - Provides high-level information about the evaluation process for the objects and settings configured in the referenced configuration items.
· Wolmgr.log - Contains information about wake-up procedures such as when to wake up advertisements or deployments that are configured for Wake On LAN.
· WolCmgr.log - Contains information about which clients need to be sent wake-up packets, the number of wake-up packets sent, and the number of wake-up packets retried.
· ciamgr.log - Provides information about the addition, deletion, and modification of software update configuration items.
· distmgr.log - Provides information about the replication of software update deployment packages.
· objreplmgr.log - Provides information about the replication of software updates notification files from a parent to child sites.
· PatchDownloader.log - Provides information about the process for downloading software updates from the update source specified in the software updates metadata to the download destination on the site server.
· replmgr.log - Provides information about the process for replicating files between sites.
· smsdbmon.log - Provides information about when software update configuration items are inserted, updated, or deleted from the site server database and creates notification files for software updates components.
· SUPSetup - Provides information about the software update point installation. When the software update point installation completes, Installation was successful is written to this log file.
· WCM.log - Provides information about the software update point configuration and connecting to the Windows Server Update Services (WSUS) server for subscribed update categories, classifications, and languages.
· WSUSCtrl.log - Provides information about the configuration, database connectivity, and health of the WSUS server for the site.
· wsyncmgr.log -Provides information about the software updates synchronization process.
· Change.log - Provides information about the WSUS server database information that has changed.
· SoftwareDistribution.log - Provides information about the software updates that are synchronized from the configured update source to the WSUS server database.
· CAS.log - Provides information about the process of downloading software updates to the local cache and cache management.
· CIAgent.log - Provides information about processing configuration items, including software updates.
· LocationServices.log - Provides information about the location of the WSUS server when a scan is initiated on the client.
· PatchDownloader.log - Provides information about the process for downloading software updates from the update source to the download destination on the site server. This log is only on the client computer configured as the synchronization host for the Inventory Tool for Microsoft Updates.
· PolicyAgent.log - Provides information about the process for downloading, compiling, and deleting policies on client computers.
· PolicyEvaluator - Provides information about the process for evaluating policies on client computers, including policies from software updates.
· RebootCoordinator.log - Provides information about the process for coordinating system restarts on client computers after software update installations.
· ScanAgent.log - Provides information about the scan requests for software updates, what tool is requested for the scan, the WSUS location, and so on.
· ScanWrapper - Provides information about the prerequisite checks and the scan process initialization for the Inventory Tool for Microsoft Updates on Systems Management Server (SMS) 2003 clients.
· SdmAgent.log - Provides information about the process for verifying and decompressing packages that contain configuration item information for software updates.
· ServiceWindowManager.log - Provides information about the process for evaluating configured maintenance windows.
· smscliUI.log - Provides information about the Configuration Manager Control Panel user interactions, such as initiating a Software Updates Scan Cycle from the Configuration Manager Properties dialog box, opening the Program Download Monitor, and so on.
· SmsWusHandler - Provides information about the scan process for the Inventory Tool for Microsoft Updates on SMS 2003 client computers.
· StateMessage.log - Provides information about when software updates state messages are created and sent to the management point.
· UpdatesDeployment.log - Provides information about the deployment on the client, including software update activation, evaluation, and enforcement. Verbose logging shows additional information about the interaction with the client user interface.
· UpdatesHandler.log - Provides information about software update compliance scanning and about the download and installation of software updates on the client.
· UpdatesStore.log - Provides information about the compliance status for the software updates that were assessed during the compliance scan cycle.
· WUAHandler.log - Provides information about when the Windows Update Agent on the client searches for software updates.
· WUSSyncXML.log - Provides information about the Inventory Tool for the Microsoft Updates synchronization process. This log is only on the client computer configured as the synchronization host for the Inventory Tool for Microsoft Updates.
· WindowsUpdate.log - Provides information about when the Windows Update Agent connects to the WSUS server and retrieves the software updates for compliance assessment and whether there are updates to the agent components.
81. What is WAIK? Tools of WAIK?
Tools Included with the Windows AIK
The following table shows the important tools that are included with the Windows AIK.
|
Tool
|
Description
|
|
Windows System Image Manager (Windows SIM)
|
The tool used to open Windows images, create answer files, and manage distribution shares and configuration sets.
|
|
ImageX
|
The tool used to capture, create, modify, and apply Windows images.
|
|
Deployment Image Servicing and Management (DISM)
|
The tool used to apply updates, drivers, and language packs to a Windows image. DISM is available in all installations of Windows 7 and Windows Server 2008 R2.
|
|
Windows Preinstallation Environment (Windows PE)
|
A minimal operating system environment used to deploy Windows. The AIK includes several tools used to build and configure Windows PE environments.
|
|
User State Migration Tool (USMT)
|
A tool used to migrate user data from a previous Windows operating system to Windows 7. USMT is installed as part of the AIK in the %PROGRAMFILES%Windows AIKToolsUSMT directory. For more information about USMT, see the User State Migration Tool User’s Guide (%PROGRAMFILES%Windows AIKDocsUsmt.chm).
|
82. Modes of OSD in SCCM?
Microsoft® recommends a few targeted strategies for deploying the Windows® 7 operating system. These strategies range from manually configuring the Windows 7 software on a few computers to using automation tools and technologies to deploy the software to thousands of computers.
Following are details about four recommended deployment strategies. After you choose a strategy, you can read the detailed information about it later in this document.
High-Touch with Retail Media. A hands-on, manual deployment, where you installing the Windows operating system on each client computer by using the retail installation DVD, and you manually configure each computer. This strategy can save your organization time and money by helping you automate portions the installation process. We recommend this strategy if your organization does not have dedicated information technology (IT) staff, and it has a small, unmanaged network with fewer than 100 client computers.
High Touch with Standard Image. This strategy is similar to the High Touch with Retail Media strategy, but it uses an operating system image that includes your customizations and application configurations. We recommend this strategy if your organization has at least one IT pro (with or without prior deployment experience) on staff, and a small or distributed network with 100–200 client computers.
Lite-Touch, High-Volume Deployment. This strategy requires limited interaction during deployment. Interaction occurs at the beginning of the installation, but the remainder of the process is automated. We recommend this strategy if your organization has a dedicated IT staff, and it has a managed network with 200–500 client computers. Prior deployment experience is not required, but it is beneficial for using this strategy.
Zero-Touch, High-Volume Deployment. This strategy requires no interaction during deployment. The process is fully automated through Configuration Manager 2007 R2. We recommend this strategy if your IT organization has experts in deployment, networking, and Configuration Manager 2007 R2 products, and it has a managed network with 500 or more client computers.
The strategy table below shows guidelines for choosing a strategy based on many factors, including the skill level of your organization’s IT staff members, your organization’s license agreement, the number of client computers, and your infrastructure.
To use the strategy table, choose the column that best matches your organization’s network scenario. In cases where you identify with multiple columns, start with the leftmost column. As you move to the right on the chart, the solutions require more skills and investment to implement, and they provide for quicker, more thorough and more automated deployments.
As you plan to deploy more computers, consider improving your scenario to enable you to move right in the strategy table. For example, if the only criterion preventing you from performing a Lite-Touch, high-volume deployment is that you are using retail media, consider purchasing a volume license. Click the link in the heading of the chosen column to read more about implementing that particular strategy.
|
|
||||
|
IT skill level
|
IT generalist
|
IT pro with optional deployment experience
|
IT pro with deployment experience recommended
|
IT pro with deployment and Configuration Manager 2007 R2 expertise
|
|
Windows license agreement
|
Retail
|
Retail or Software Assurance
|
Software Assurance
|
Enterprise Agreement
|
|
Number of client computers
|
<100
|
100–200
|
200–500
|
>500
|
|
Infrastructure
|
· Distributed locations
· Small, unmanaged networks
· Manual client computer configuration
|
· Distributed locations
· Small networks
· Standardized configurations, including applications
|
· Managed networks
· At least one office with more than 25 users
· Windows Server® products
· Configuration Manager 2007 R2 (optional)
|
· Managed network
· At least one office with over 25 users
· Windows Server products
· Configuration Manager 2007 R2
|
|
Application support
|
Manually installed commercial applications
|
Manually installed commercial or line-of-business (LOB) applications
|
Automatically installed commercial or LOB applications
|
Automatically installed commercial or LOB applications
|
|
User interaction
|
Manual, hands-on deployment
|
Manual, hands-on deployment
|
Limited interaction at the beginning of installation
|
Fully automated deployment
|
|
Lower cost and effort by…
|
…automating client computer configuration
|
…creating standardized images
|
…providing network-based deployment to support large-scale deployment with limited interaction
|
…providing network-based deployment to support large scale-deployment with no interaction
|
|
Helping to…
|
…create reproducible and faster client computer installation
|
…reduce configuration testing and deployment time
|
…leverage standardized images with network access by using pullautomation
|
…leverage standardized images with network access by using pushautomation
|
|
Strategy description
|
||||
|
Windows 7 Tools
|
· Retail media
|
· Retail or volume-licensed (VL) media
|
· VL media
· MDT 2010
· ACT 5.5
|
· VL media
· MDT 2010
· ACT 5.5
|
83. PXE Point Configuration and deployment?
To create the PXE service point
1. In the Configuration Manager console, navigate to System Center Configuration Manager / Site Database / Site Management / <site code> - <site name> / Site Settings / Site Systems.
2. To start the New Site Role Wizard, click Action on the Configuration Manager console, and then click NewRoles. Alternatively, in the Actions pane, or right-click Site System Roles, and then click New Roles.
|
|
|
You can deploy and configure multiple PXE service point servers depending on your network topology.
|
3. On the General page of the wizard, optionally provide the fully qualified host name (FQDN) for the server, and then specify which account credentials should be used to install the site system role.
4. On the System Role Selection page, select PXE Service Point.
5. On the PXE-General page, specify whether the PXE service point is enabled to respond to incoming PXE requests.
|
|
|
This option will temporarily disable this PXE server and should be selected only if there are conflicting PXE servers on the network.
|
6. You can specify a password for computers that boot to PXE.
|
|
|
For unattended deployments, do not specify a password. If a password is specified, a user must be present at the client computer to enter the password or the deployment will fail.
|
7. Specify whether this server will respond to PXE service requests on all network interface adapters or a specific network interface adapter in the Interfaces section by entering the MAC address for all applicable interfaces.
If multiple PXE service points are used, enter the number of seconds the PXE service point should wait before responding to PXE requests in the Delay box. Use this option only when there are multiple PXE servers on the same subnet.
8. On the PXE-Database page, specify the account the PXE service point should use to connect with the Configuration Manager 2007 database. The account specified must have the necessary permissions on the client computers running Microsoft SQL Server and Configuration Manager 2007 client permissions.